Documentation Index
Fetch the complete documentation index at: https://docs-staging-docs-update-privilege-worker-ea-rollout.mintlify.app/llms.txt
Use this file to discover all available pages before exploring further.
Before you start
Create a SAML Connection in your Auth0 tenant and connect it to a corresponding custom SAML application in your Okta Workforce Identity Dashboard.
Configure SCIM settings in Auth0
- Launch the Auth0 Dashboard and go to Authentication > Enterprise > SAML > [Connection] > Provisioning.
- Disable Sync user profile attributes at each login unless you want to sync additional attributes at login.
- In the same section, enable Sync user profiles using SCIM.
- Under the Mapping tab, ensure the SCIM attribute containing the User ID setting is set to userName.
-
Review the Additional Mappings to ensure the extended SCIM attributes are mapped to your preferred Auth0 attributes, reviewing attribute mapping for details. If you receive phone numbers and physical addresses, note that Okta Workforce sends these as
phoneNumbers[primary eq true].valueandaddresses[primary eq true].*by default. -
Map the SCIM
userNameattribute to the Auth0emailattribute so Okta can find and match existing users if this connection has already been deployed to production using the email address as the login ID and no Auth0usernameattribute is set on the existing user profiles. In Additional Mappings find the following attribute pair:Replace it with the one below, then remove the mapping toemails[primary eq true].value. - Choose Save Changes.
Retrieve SCIM endpoint URL and token
- In the Auth0 dashboard, browse to the SCIM Setup tab and copy the SCIM Endpoint URL, then paste it somewhere safe.
- Select Generate New Token and set an optional expiration date for the token. You can optionally select the scopes you want to grant to Okta Workforce; the default scopes used by Okta Workforce are
get:users,post:users, andput:users. You may optionally selectget:groups,post:groups,put:groups,patch:groups, anddelete:groupsto provision groups.
Configure SCIM in Okta Workforce for SAML Apps
There are two ways to configure SCIM provisioning in Okta. Choose the method that matches your connection type and group size requirements:| Method | Description | Considerations |
|---|---|---|
| SAML application | Uses the existing Provisioning tab for SAML applications in Okta. This method does not support the PATCH for groups, limiting the maximum group members to what can be sent in a single POST or PUT request. | Appropriate for pushing users. Does not support pushing groups with more than 10,000 members. |
| SCIM template application | Uses a SCIM 2.0 template app in Okta that supports the SCIM PATCH method with groups. Required for pushing groups over 10,000 members. | Works alongside existing SAML or OIDC SSO integrations. Supports pushing groups with more than 10,000 members. |
Okta SAML application
- Go to your Okta Workforce Identity SAML application, select the General tab, then choose Edit for App Settings.
- In the Provisioning section, select SCIM and then Save.
- Under the General tab, also confirm that Federation Broker Mode is disabled.
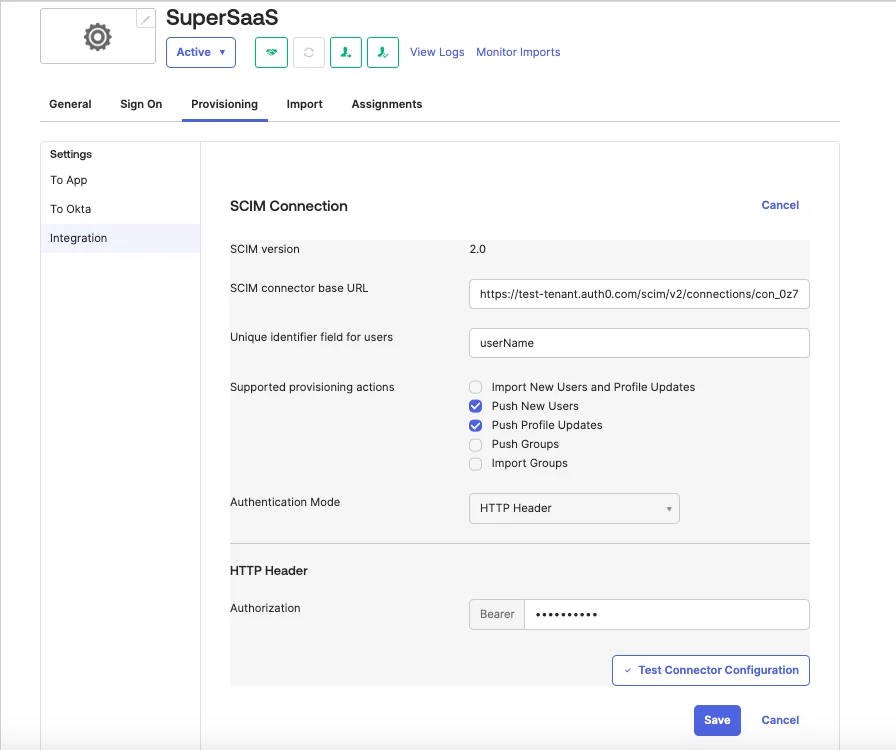
- Select the Provisioning tab, then go to Integration tab and select Edit.
- Enter the SCIM Endpoint URL value you copied earlier into the SCIM connector base URL section.
- For Unique identifier field for users, enter userName.
-
Under Supported provisioning actions, select
Push New Users,Push Profile Updates, and optionallyPush Groups. Choose HTTP Header as the Authentication Mode. -
Paste the SCIM token into the Authorization field, then choose Test Connection Configuration if you want to test the new connection. Select Save.
-
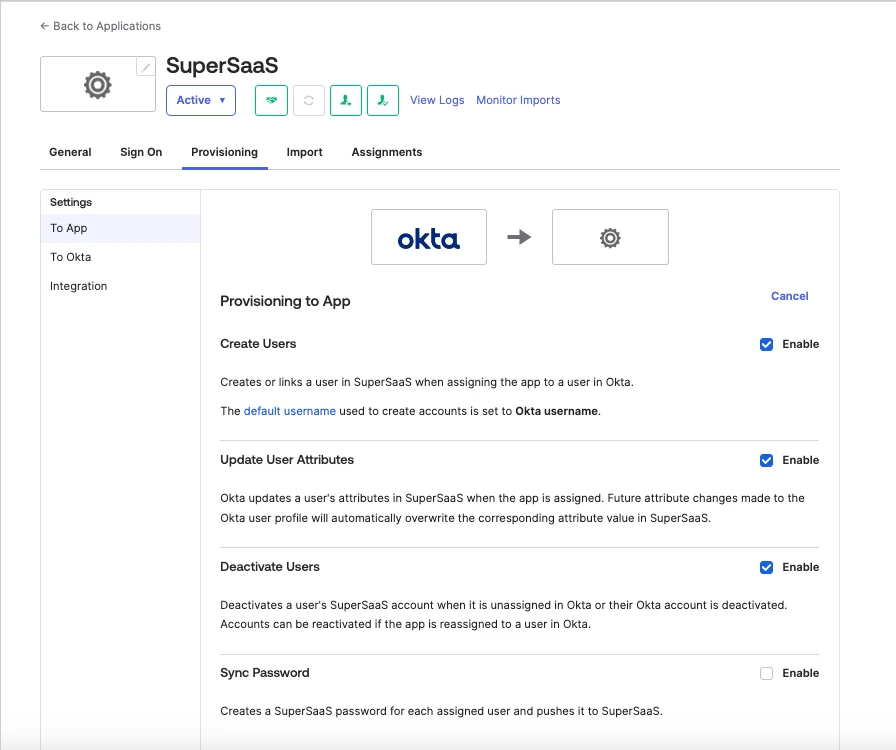
Browse to Provisioning > Settings > To App and choose Edit, then enable the Create Users, Update User Attributes, and Deactivate users operations. Select Save.
- Under the Attribute Mappings section, use the X button to delete the following lines:
| Attribute | Value |
|---|---|
| Primary email type | (user.email != null && user.email != '') ? 'work' : ‘' |
| Primary phone type | (user.primaryPhone != null && user.primaryPhone != '') ? 'work' : ‘' |
| Address type | (user.streetAddress != null && user.streetAddress != '') ? 'work' : ‘' |
- Use the Assignments tab to assign users and/or groups to your application. Assigning a group provisions its users into your Auth0 tenant.
- To push groups, select the Push Groups tab, find and select the group to push, then select Save. For more information, read Okta’s App assignments and Group Push documentation.
Okta SCIM template application
- In the Okta portal, select Applications > Browse App Catalog, search for (OAuth Bearer Token) Governance with SCIM 2.0, and select Add Integration. Set an Application label, check Do not display application icon to users, uncheck Browser plugin auto-submit, then select Next and Done.
- From the integration’s settings page, select the Provisioning tab, then Configure API Integration. Check Enable API Integration. Copy the SCIM Endpoint URL from the Auth0 Dashboard Setup tab and paste it into the SCIM 2.0 Base URL field, removing any trailing forward slash. In the Auth0 Dashboard, select Generate New Token > Generate Token > Copy and Close, then paste the token into the OAuth Bearer Token field in Okta. Optionally select Test API Credentials, then select Save.
- Next to Provisioning To App, select Edit. Enable only: Create Users, Update User Attributes, and Deactivate Users. Uncheck Set password when creating new users, then select Save.
-
Under Attribute Mappings, use the X button to delete these lines, which can cause issues during
PUToperations:Optionally configure additional SCIM attributes to send from Okta to your SCIM endpoint.Attribute Value Primary email type (user.email != null && user.email != '') ? 'work' : ''Primary phone type (user.primaryPhone != null && user.primaryPhone != '') ? 'work' : ''Address type (user.streetAddress != null && user.streetAddress != '') ? 'work' : '' -
Use the Assignments tab to assign users and/or groups to your application. Assigning a group provisions its users into your Auth0 tenant.
The same groups and users must be assigned to both the SSO app instance and the SCIM app instance in Okta.
- To push groups, select the Push Groups tab, find and select the group to push, then select Save. This provisions the full group object to Auth0. For more information on the relationship between Group Push and assignments, read Okta’s App assignments and Group Push documentation.